If you have used a webcam before you know what it means to look like shit on camera. Even the most expensive consumer webcams produce a “meh” result. So why do webcams suck? It’s their design. The webcam form factor has a bunch physical challenges that limits them from producing a good looking picture.
Beware, the ideas outlined below are based on my experience and are by far not comprehensive or complete. That is not the idea of this post. Someone in the field of cameras will probably pick this apart on details. The global ideas stand, however.
Why webcams suck
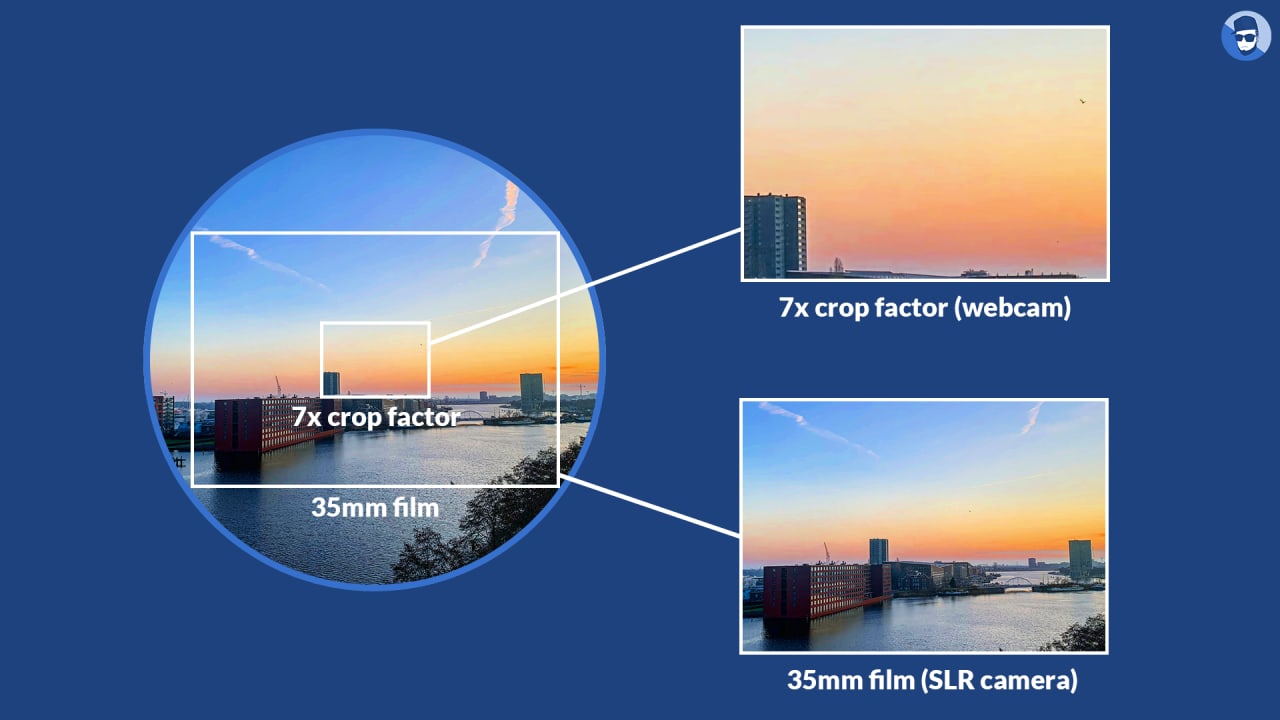
Let’s get a bit technical. Almost all webcam image sensors are somewhere between 1/4" and 1/3" in size and they have a crop factor of around 7. Crop factor is a term that describes the difference between your camera’s sensor size and a traditional 35mm film frame. In the case of a webcam’s image sensor size and its crop factor a normal 18mm lens is the equivalent of a 126mm zoom lens. I might be a bit off here. The idea is that the crop factor plays a huge role.
A webcam tends to be positioned around 40cm (1.3 feet) from your face. Due to the high crop factor an extremely wide angle lens is needed to get a good visual at that distance. Think about it. If a 18mm lens is the equivalent of an 126mm lens it means that something we consider normal on a SLR camera is extremely zoomed in on a webcam. So, we need to zoom it out. BY A LOT. To do that, we use a wide angle lens.
The problem is, the wider you go, the less sharp the picture gets. If there wasn’t enough against the webcam form factor: the lenses in webcams are generally cheap and shitty. The webcam’s physical limitations make it terrible in low light situations. Even with studio lighting the image can appear grainy.
There are more issues. Yikes.
If you check out high quality content there is always a nice bokeh effect. The more light a lens can capture (aperture) and the bigger the image sensor, the more bokeh you can expect. Bokeh is awesome, everybody needs bokeh.
In webcams autofocus works from about 1cm until 60cm (2feet). After that everything is always sharp. Webcams have a shallow depth of field. No bokeh. Not even close.
Combine a small sensor, a crappy wide angle lens and a shallow depth of field and you have the average webcam. A 200 euro webcam isn’t that much better than a 50 euro webcam. Sad but true.
But why does my phone camera look so good?
A real camera or a phone have much more computational power. The camera on a phone is almost its main feature nowadays. It’s where all the advertisement dollars go. Phones have bigger sensors, better lenses and sometimes even a dedicated hardware chip just for image processing.
Most webcams also have some sort of processing power on board but it always kind of sucks. It mainly compresses the video feed so it’s streamable over the USB connection. Due to the compressed stream the PC hardly needs any processing to show the video. You have no access to aperture, shutter speed or ISO though.
You can only post process the signal. But the damage is usually already done at this stage.
But why aren’t there any amazing webcams out there?
It’s definitely possible and there are niche brands that build 1000 euro webcams. But if you have to spend that much, why not just buy a real camera? The actual market for webcams is likely just for conference calls, skype with family (if you don’t have a laptop or a phone) or content creators who are starting out. If webcams get too expensive, nobody will buy them.
You can make it work however
In this post I’ll outline some tips and tricks you can apply to make your webcam look better. All techniques described below are applicable to any sort of camera setup. If you have a proper camera it just works better. We will be covering two topics. Lighting and post processing settings.
Lighting
Lighting is by far the most important part of your setup if you want to make your webcam image look good. As mentioned before, webcams are not great in low light situations. To overcome this limitation you have to blast the filming subject (you) with light.
Light temperatures
There are different types of light that need different white balance settings. Generally light bulbs are yellow and sun light is blue. When combining both you can green a green overtone. White balancing your camera in software is very important in this case.
I’d suggest not to use sunlight as it is hard to control. Close your blinds and go for light bulbs or LED lights only. There are many cheap options out there. Most lights can deliver different color temperatures ranging from 2500 (sunset) to 10000 (blue sky). Generally 5500 is considered noon daylight.
Shadows & diffusion
Light can be cast in different ways. Harder shadows and lighting from the top is used to depict movie villains for example. If you want an dramatic look, use hard shadows and light yourself from one side. If you want to look more mainstream use softer shadows and light yourself from more angles.
To generate softer shadows you have to diffuse your light. The more focused a light source is, the harder the shadows. The more diffusion is added, the softer the shadows. I personally use a couple of cloths of white t-shirt fabric stretched over my lights. Obviously there are also more professional ways to diffuse light but these are not available to everyone.
Your light setup
Now that we have our color temperatures and diffusion out of the way, let’s talk about how to set up your lights so you are lit properly for the webcam. If you have very limited options, just put a big light behind your camera and blast your face with white light. This will give you a 100% quality boost over having no lights.
If you have a little bit more flexibility I suggest using a three point light setup. The three point light setup is considered industry standard and will generally give you great results.
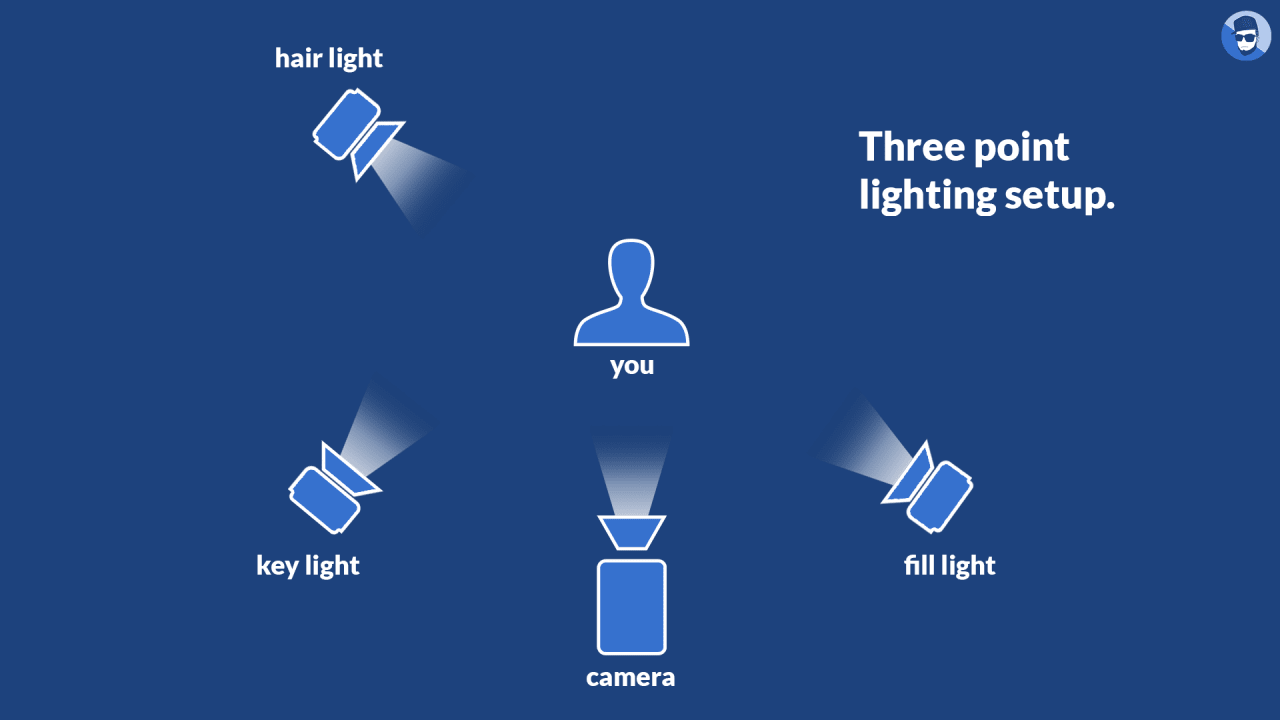
The three point light setup assumes you have a “key light”, a “fill light” and a “hair light”.
- Key light: This is the main light source. It shines directly on the subject, usually from the front right or front left. It establishes the overall look and feel of the shot.
- Fill light: The fill light provides balance to the key light by “filling in” the rest of the subject’s face with softer light. It should be positioned to the side opposite side of the key light.
- Hair light: Also called “back light” or “rim light”. This light creates a flattering rim of light around the subject, separating him or her from the background.
This is how to set up your lights. To start turn all lights off so you are in a dark room.
- Turn on your key light. Your key light is the brightest light in the scene and the one that creates the overall feel of the shot. Adjust its brightness to your liking. You should position the key light in a relatively high spot to reduce shadows on the face.
- Add your fill light. The fill light should be on the opposite side of the key light, but still in front of the subject. Don’t make the key and fill lights symmetrical. The fill should be at the subject’s face level, and should get rid of any remaining shadows. The intensity of the fill light should be about half that of the key light.
- Bring in the hair light. The back light separates you from the background. It can be placed anywhere behind the subject. Make sure to keep it out of the shot. Angle it down from a high position to achieve a sharp outline on the edge of the subject.
If there are lights behind you, make sure these have a very low intensity so they do not distract from you, the subject of the shot. To make the shot more interesting you can add some fun colored lights behind you as long as they are not too distracting. This is obviously not needed but it’s a fun thing to add.
Application settings
We are almost there! Let’s tweak some settings to make the camera quality appear much higher.
Turn things off.
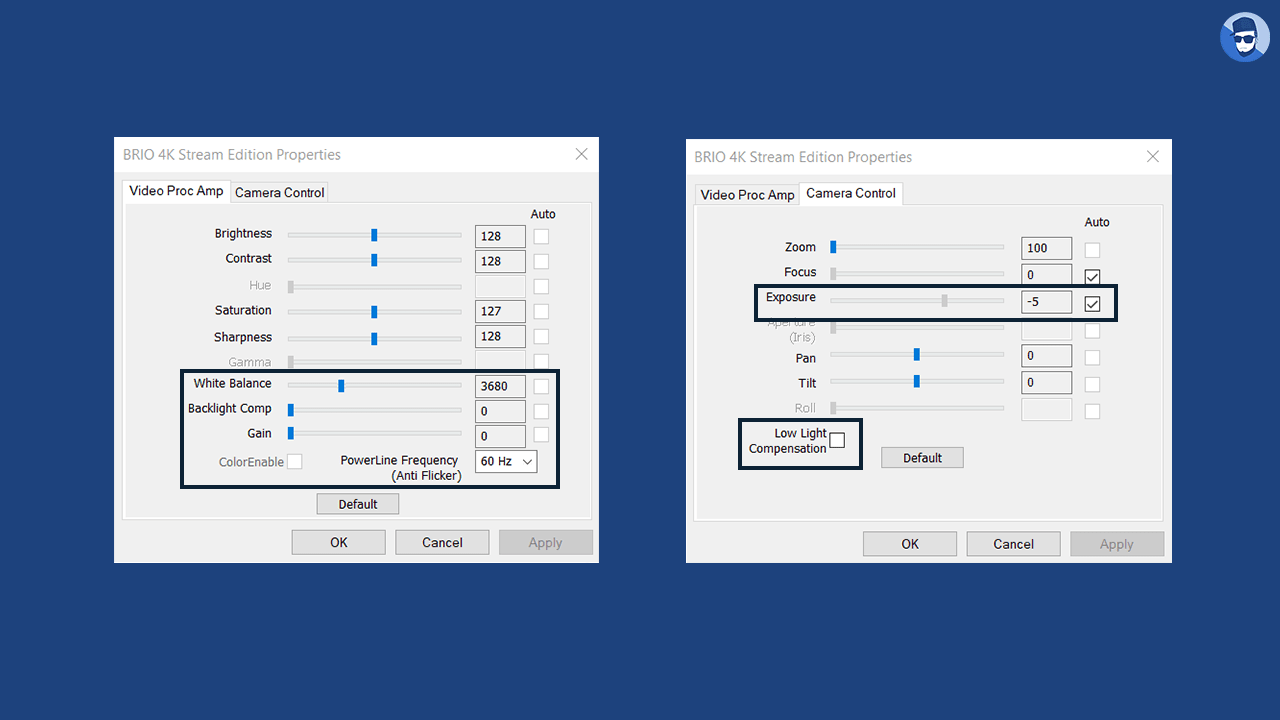
I have a Logitech webcam. This camera comes with a little control panel that allows for some post process tweaking of the camera feed. If you are well lit you can turn off a bunch of things in this interface. First of all, keep the settings for brightness, contrast, saturation and sharpness at the default. We will fix these at a later stage.
- Set the white balance on a fixed setting and make sure it is not set to auto. For my setup a white balance at around 4000 works.
- Make sure to turn off Backlight compensation and Gain. We do not need these as we are well lit.
- In the next tab make sure exposure is set to “auto”. If you attempt to expose yourself manually with a Logitech webcam all hell brakes loose. The image either looks like crap or your framerate will drop significantly.
- Make sure to turn off Low Light compensation. There is no need for this as you are well lit.
Color correction
I use OBS, which comes with a great plugin to color correct the video feed from your webcam. The smallest adjustments give a great result. Stay subtle with the changes and your video will look a lot better fast.
LUT
Instagram filters can make a simple picture of food look like a very fancy picture of food. You can use these same kinds of filters on webcams too! It’s amazing what a little cosmetic tweak can do to your video quality. The filters I’m talking about are called LUT. LUT’s are generally used in the professional film world to color grade a movie.
LUT’s are simple, easy-to-use filters that can be applied directly into OBS allowing your webcam presentation to become brighter or more cinematic. For a great free pack of LUT’s go here: https://gamingcareers.com/guides/30-free-webcam-filters-obs/
You can try one more thing
If you have a cheap camera with a shallow depth of field and your lights are set up well, you can use a program called xsplit vcam to create a software bokeh effect! Beware, you need a relatively strong graphics card and the lighting needs to be spot on. Also, the program is not free.
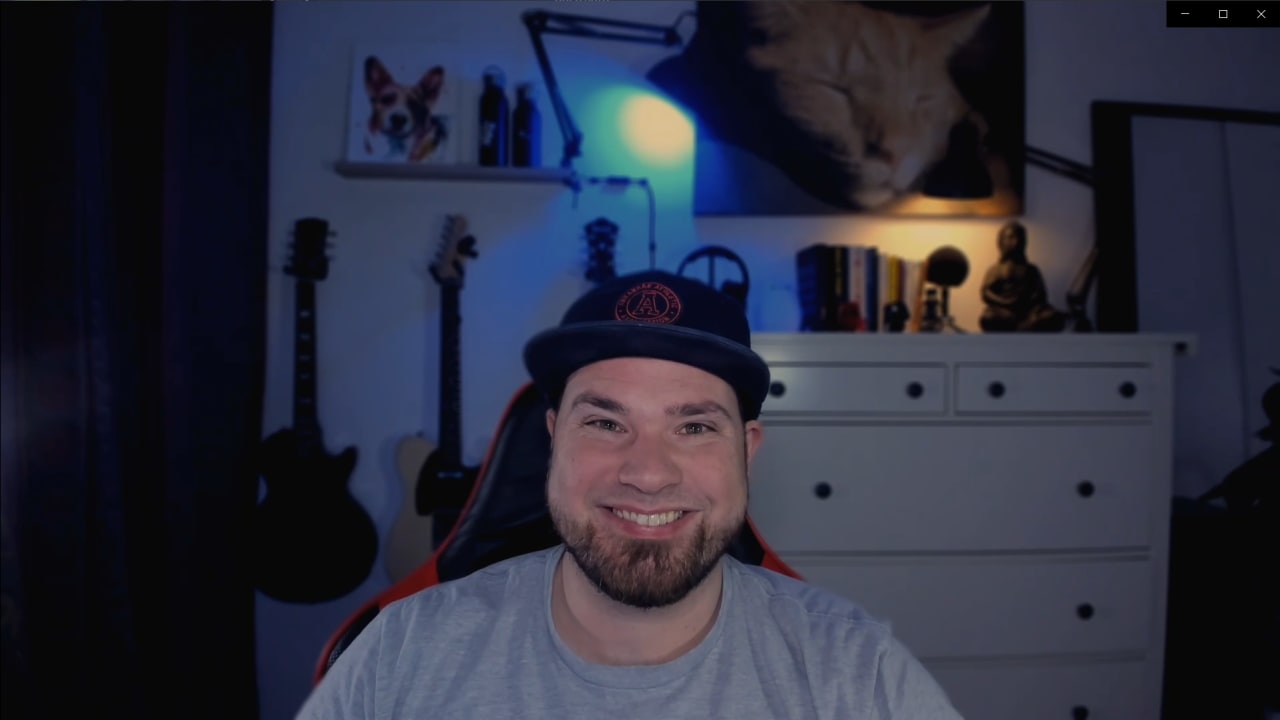
That's it
This is the result I got after a bit of research and tweaking settings.